This is NOT recommended!
By default, databases in XAMPP are created with the user root having a blank password. This poses a security risk if the computer or database are publically accessible. However, for local development and testing, this should not be a problem.
This tutorial assumes that you have XAMPP 1.7.3 installed.
The procedure should be the same for other versions of XAMPP.
A XAMPP installation procedure for Windows XP can be found here.
WARNING: you will need to update your phpmyadmin configuration file to login using the new password, otherwise you will no longer be able to use phpmyadmin.
Even if you assign a password to root, someone can still gain access to it by inspecting the phpmyadmin configuration file (where the password is plainly visible).
Click on images for full sized versions.
Assigning a password to ‘root ‘
(1) Enter http://localhost/phpmyadmin into your browser’s URL field. This will bring you to the phpmyadmin main page.
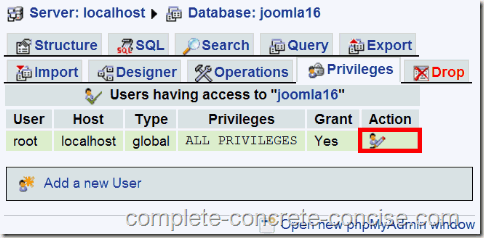
(2) Click on the Privileges tab:
 (3) Click on the icon in the Action column:
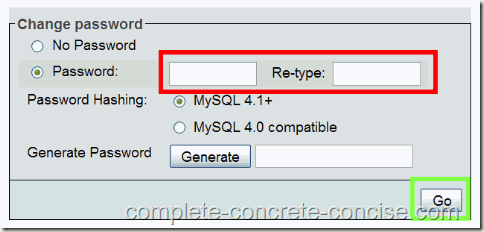
 (4) Scroll down to the password section:
 Enter a password and retype it to confirm it. Click on Go to accept it.
A password should be composed of basic ASCII characters (‘a’..’z’, ‘A’..’Z’, and “0’..’9’). Numerous forums report errors trying to use other ASCII characters.
There is no mention in the MySql documentation of maximum password length. The Generate Password function generates passwords of 16 characters in length, so it is reasonable to assume this is the maximum.
Password Hashing:
MySql 4.1+ will generate a 41 byte password hash (MySql does not store the actual password, it stores an encrypted 41 byte hash of the password. When it verifies your password, it encrypts it and checks the encryption against the stored hash, if they match the password is accepted. This is more secure because the hash is not reversible, i.e. you cannot discover the password by reversing the encryption process). Unless you require backwards compatibility with older database engines, leave MySql 4.1+ selected.
MySql 4.0 compatible will generate a 16 byte password hash (MySql does not store the actual password, it stores an encrypted 16 byte hash of the password. When it verifies your password, it encrypts it and checks the encryption against the stored hash, if they match the password is accepted. This is more secure because the hash is not reversible, i.e. you cannot discover the password by reversing the encryption process).
Generate Password:
Alternately, you may allow MySql to generate a password for you by clicking on the Generate button. It generates a 16 character password. (Just make sure you write it down somewhere.) You still have to click on Go to accept it.
Don’t forget to update any applications using this database to use the new password!
Updating the phpmyadmin Configuration File
(1) Locate the file config.inc.php. This will be found in your XAMPP 1.7.3 directory under the folder phpmyadmin (in my case, this is D:\xampp\phpmyadmin – since I installed XAMPP to my D-drive. In most installs, it will be located in the C-drive).
(2) Open the file config.inc.php with a plain text editor (such as notepad – I used notepad++).
(3) Find the following two lines:
$cfg['Servers'][$i]['password'] = '';
$cfg['Servers'][$i]['AllowNoPassword'] = true;
On the line with first line (the one with {'password'} in it, enter your password between the two single quotes on the right side.
On the next line (the one with {'AllowNoPassword'} in it, change the true to false.
(4) Save the file.


Is it not true then that when you ‘AllowNoPassword’= false you should also change— $cfg[‘Servers’][$i][‘controlpass’]=”; to
$cfg[‘Servers’][$i][‘controlpass’]=’pmapass’; as well?
Sorry about the dely in replying (your comment got buried in an avalanche of SPAM comments).
No, it is not necessary to do so. You only need to do that if you want an automatic login to the phpmyadmin console (that’s what the pmapass is for).
To be honest, this is not a terribly good article and I should rewrite it to use http://localhost/security/ which
(1) allows you to see the security status of your XAMPP setup and
(2) gives you a link to a page (http://localhost/security/xamppsecurity.php ) that allows you to configure passwords for the system, thus eliminating any need to manually edit any files.
Thanks for the question (and sorry about the delay in responding).
Thankyou for this wonderful tutorial <3
Thank you for the positive comment