This tutorial describes how to install WordPress version 3.1, 3.1.1, 3.1.2, 3.1.3, 3.1.4, 3.2.0 and 3.2.1 under XAMPP version 1.7.3 on Windows XP.
The procedure should be the same for other version combinations, but no guarantee is made.
Assumes you have already
- installed XAMPP. (Installation instructions can be found here.)
- created a MySQL database. (Creation instructions can be found here.)
I do not recommend using XAMPP 1.7.4 because of configuration and functionality issues with that version.
NOTE:Under certain conditions, 3.1.3 may not work correctly and generate errors. Most commonly this is happens when trying to manage Media in the back end of WordPress. There is a patch called Hotfix which may resolve the problem for you (it did for me).
NOTE: WordPress 3.2 has been released. Currently, I am on holidays, so I can’t test out the install. I will do so after I get back – sometime after 19-Aug-2011. If there are any problems, please let me know. WordPress 3.2 upgraded the requirements of php to version 5.2.4 and MySQL to version 5.0.14. This should be fine with XAMPP 1.7.3 since it uses php version 5.3.1 and MySQL version 5.1.44. WordPress 3.2 also stops support for Internet Explorer 6 (if supporting IE 6 is important, then DON’T upgrade), it also starts an End-of-Life cycle for Internet Explorer 7 (IE 7 is still supported, but support is on its last legs).
Some images may be clicked for full size versions (if your cursor changes when you move over an image, there is a larger version available).
Downloading WordPress
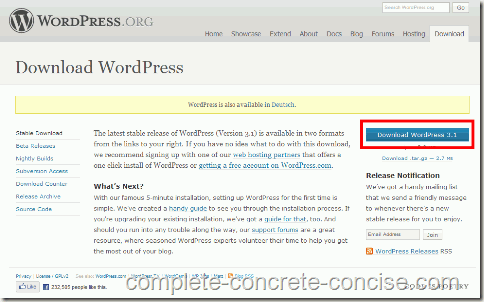
1) Download WordPress from here. Click on the Download WordPress button:
2) Click on the save button and remember where you saved the file:. 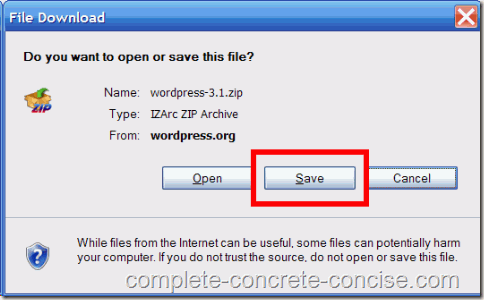
Extracting WordPress
3) Open the downloaded file by double-clicking on it. From the File menu, select Extract All. NOTE: this step assumes Windows provides archiving functionality for you. If you have installed a different archiving program, the specific steps for extraction will be different.
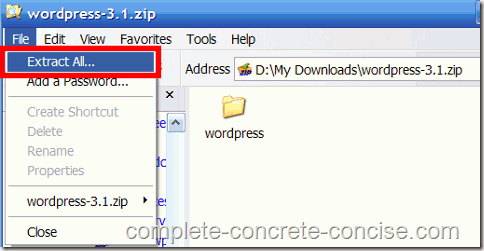
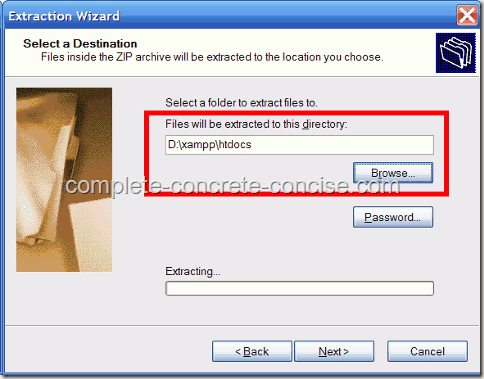
4) Extract the WordPress files into the htdocs folder in your XAMPP folder. By default, XAMPP would be installed to your C:\ drive, so you would enter C:\xampp\htdocs as the directory to extract to. (In my case, I installed XAMPP to my D:\ drive). WordPress will be extracted into a folder named wordpress. NOTE: if you want to install WordPress into a different directory under htdocs (say my_wordpress or MySite or whatever, then instructions for doing this can be found here.
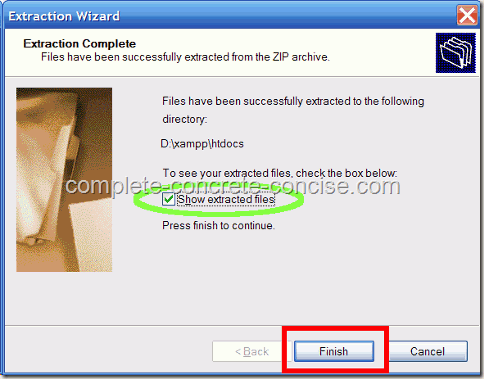
5) Click Finish when the extraction is complete. You can uncheck the Show extracted files checkbox because we don’t need to see the files.
Setting up WordPress
6) Launch your browser and type http://localhost/wordpress into the address bar. What follows http://localhost/ is the directory you installed WordPress into (unless you changed the directory in Step (4), this will be wordpress

7) Click on Create a Configuration File at the notification screen advising that a wp-config.php file needs to be created.
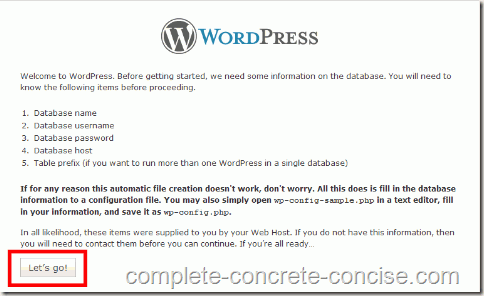
8) Click on Let’s go! to begin configuring and installing WordPress:
9) Fill in the database configuration information and click on Submit::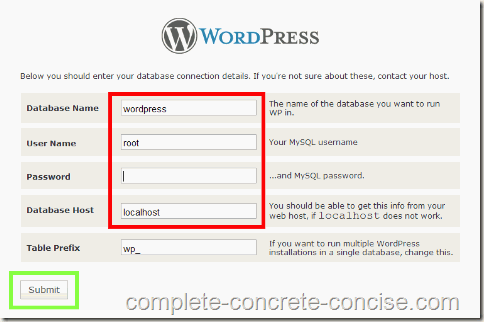
- Database Name: this is the name of the database you created. Database creation instructions are here. (The default is wordpress.)
- User Name: if you created a MySql User for the database (not necessary), enter the name here. Otherwise, use root.
- Password: this is the password associated with the user name entered above. If you used root as your username, then leave the password blank (the default XAMPP install does not assign a password to root). Otherwise, enter the password associated with the User Name.
- Database Host: localhost (default setting)
10) Click on Run the install:
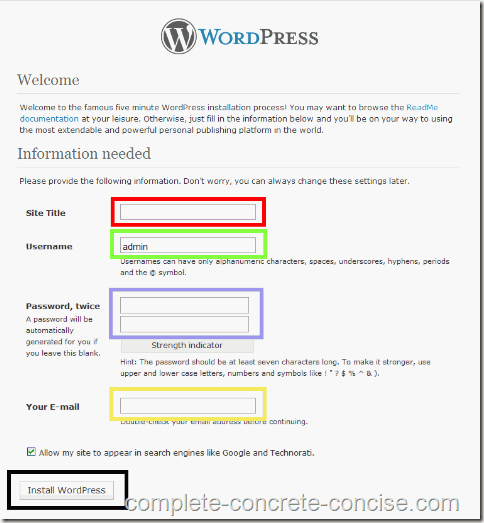
11) Fill in some information about your site and site administrator and then click on Install WordPress.
- Site Title: Enter the name of your website.
- Username: Enter the username that will be used for logging into the backend of your WordPress site. The default is admin.
- Password: Enter a password that will be used to login to the backend of your WordPress site. There is also a strength indicator which shows you how secure your password is.
- Your E-mail: Enter an e-mail address that your site will send notifications to.
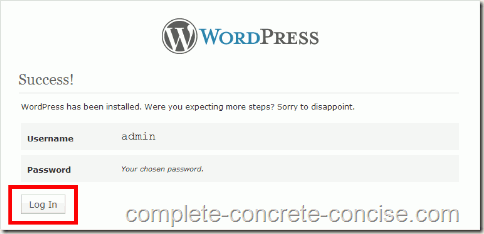
12) Click on Log In to log into your WordPress site.
To log into your WordPress backend, you would enter http://localhost/wordpress/wp-login.php
If you installed WordPress to a different directory, then you would enter that directory name instead of wordpress in the URL.
If you want to access the installed site using a “real” web address (like www.wordpress.3) instead of localhost/path-name, you can find instructions to do that here.
